Most of you have Leoxsys leo-nano150n usb adapter installed in your computer. But what about driver its hard to find original OEM driver for these device. for you guys i have attached driver. Follow these below link to download
https://www.dropbox.com/s/js267s3rqz95mzu/leoxsys%20wifi%20driver.rar?dl=0

Hey viewers dis blog is created taking into consideration problems related to iphone...
Thursday, December 10


Thursday, May 13
Cydia Crash Fix for Iphone / Cydia not working
Hey viewers thanks for visiting here , I actually wrote this out myself on my blog bcz I am facing same problem. Before i get started, a list of a few things will be needed, as I do not want to waste your time, by finding out in the middle of the proccess you do not have access to one of these.
1. WinSCP program (If you do not have this program,please search WinSCP download via Google.com)
2. A WiFi connection (Just a plugged in router is fine, so you iphone can connect to internet via Wireless router)
3. MobileTerminal (Get this Via Cydia/Rock, if you can’t get it ur self no need to worry it’s no big deal)
4. Toggle SSH (Get this Via Cydia/ICY/ ROCK, as you will need "SSH" inorder to use it with WinSCP.)
5. If you are not able get any of my 1) 3) & 4) option than all you need is "Ifile" in your Iphone (Get this via Cydia/ICY/ROCK)
Now, Since we now have everything we need, let’s get started.
First off, open MobileTerminal via your iPhone/iPod Touch, wait for it to load
Upon it loading, type in the following:
You will get something as listed below (Example:)
What you do from here is simple.
Your next step is to either write down that source/application, as we will be needing to delete this via WinSCP. ( For reader who dn't have mobile Terminal Please ignore these step)
Skip this step if you received a message stating the source/application.
If you did not get a source or application listed. If you got a messege such as “Fatal” or another stating there was nothing wrong, or you just coulnd’t get it to work at all, in any way shape or form. You are going to have to delete everything in the folder we are going into in the next step, please read on.
Go into your device, whether it be an iPhone, and or iPod Touch, go into Toggle SSH, and enable it.
The solution to this problem is very simple. You just have to delete some files. You can either SSH and use any software like iPhone Browser OR iPhone PcSuite to access your iPhone system files (there are many others which you can use). You can also do it directly delete those files by using MobileFinder OR iFile. I prefer iFile as it has the option to delete multiple files at a time.
I used iFile and directly deleted files from my iPhone . path var/lib/apt/lists. There you have to delete all files except the ‘partial’ folder. I deleted approximately 140 files as I had installed all the repositories. After deleting all the files simply reboot your iPhone and start cydia. It should work fine and no software’s/packages shall be deleted or lost.
Note: This process is tried and tested on my iPhone3g firmware version 3.1.2
1. WinSCP program (If you do not have this program,please search WinSCP download via Google.com)
2. A WiFi connection (Just a plugged in router is fine, so you iphone can connect to internet via Wireless router)
3. MobileTerminal (Get this Via Cydia/Rock, if you can’t get it ur self no need to worry it’s no big deal)
4. Toggle SSH (Get this Via Cydia/ICY/ ROCK, as you will need "SSH" inorder to use it with WinSCP.)
5. If you are not able get any of my 1) 3) & 4) option than all you need is "Ifile" in your Iphone (Get this via Cydia/ICY/ROCK)
Now, Since we now have everything we need, let’s get started.
First off, open MobileTerminal via your iPhone/iPod Touch, wait for it to load
Upon it loading, type in the following:
"SU"
It will then ask you to login, asking for a password, the password is “alpine” and is typed in as the following:"alpine"
After entering a password, you will then need to type in the following as so:"apt-get update"
This will try and resolve the problem, by finding a direct problem with Cydia, what this does, is look for the source, and or application that is corrupt, which is causing Cydia to crash at random.You will get something as listed below (Example:)
"/var/lib/apt/lists/acuemedia.com_repertgee_cydia_packages"
What this is, is telling you what exactly is the problem with Cydia, whether it be listing an application, or a direct source.What you do from here is simple.
Your next step is to either write down that source/application, as we will be needing to delete this via WinSCP. ( For reader who dn't have mobile Terminal Please ignore these step)
Skip this step if you received a message stating the source/application.
If you did not get a source or application listed. If you got a messege such as “Fatal” or another stating there was nothing wrong, or you just coulnd’t get it to work at all, in any way shape or form. You are going to have to delete everything in the folder we are going into in the next step, please read on.
Go into your device, whether it be an iPhone, and or iPod Touch, go into Toggle SSH, and enable it.
The solution to this problem is very simple. You just have to delete some files. You can either SSH and use any software like iPhone Browser OR iPhone PcSuite to access your iPhone system files (there are many others which you can use). You can also do it directly delete those files by using MobileFinder OR iFile. I prefer iFile as it has the option to delete multiple files at a time.
I used iFile and directly deleted files from my iPhone . path var/lib/apt/lists. There you have to delete all files except the ‘partial’ folder. I deleted approximately 140 files as I had installed all the repositories. After deleting all the files simply reboot your iPhone and start cydia. It should work fine and no software’s/packages shall be deleted or lost.
Note: This process is tried and tested on my iPhone3g firmware version 3.1.2
Wednesday, May 12
Top App from Cydia
Installous

Installous once again has wowed us with its ability to be so much more than a simple app repository. Due to the overwhelming number of pirates on the previous Appulo.us server, the app now uses a better, harder, faster, stronger server that’s much, much, much more user and network friendly. Browsing and downloading apps is now easier than ever on your 3G phone. Again, we caution you to watch out for apps that are just pirated versions of App Store apps. Rather, use Installous to get those apps that are gone now from the App Store or couldn’t make it on there in the first place (like those with adult content).
Note: The install process remains the same, you need to add the hackulo.us repository to Cydia. Simply go into Cydia, navigate over to Manage, then click on Sources, and click Edit in the top right hand corner, then Add on the top left corner, once you’ve clicked add, type in “Cydia.hackulo.us” into the http repository screen. Then tap on Add Source and it’ll give you a message about piracy. Click OK on the message and download Installous through this new repo!
Cycorder
Cycorder is a little less pivotal this time around because 3GS users already know what it’s like to have a good video camera on the phone. Nevertheless, Cycorder is a tremendous app for those of us who still live just fine with our 3G iPhones. Cycorder records video just as well as it did last year and has added a few bug fixes since the writing of this article last August. Today you’ll find a much easier-to-use app as well as one that’s a bit more flexible in terms of shooting.
The ability to SSH into the phone and extract the videos remains a huge draw for those amateur videographers without video-camera equipped iPhones.
Note: REMEMBER TO FILM YOUR VIDEOS IN HORIZONTAL MODE! If you don’t, you’ll have to change the orientation of the videos in a very roundabout way.
dTunes
Tunes has also undergone a bit of an overhaul in 2010. Some essential bug fixes have made the user interface far easier to handle and the torrenting even better. dTunes is a torrenting app that allows you to grab torrents and download on the go, even over 3G. This means that you could potentially grab songs off of independent bittorrent trackers that have free music on them. These songs are then playable in an internal media player, and are easily transferrable to iTunes once you reach a station capable of SSH.
Don’t get me wrong though, dTunes is still a bit buggy, so I’d caution you to use this app carefully to avoid any of the nasty Trojans and worms that are now circulating and have made their way onto the iPhone. The directions for running torrents off your phone are easy to understand and pretty much anyone with a tiny bit of experience could get it running – just don’t count on their recommended video, music and photo sites.
Categories

Categories is a pivotal app for those of us that want a little more organization out of our phones. Categories allows the user to “wrangle” the icons on the various home screens into a self-contained folder that can then launch those programs. The idea works as well as it is ingenious – that is to say incredibly well.
Games, Jailbreak, and “Useless System Apps” currently populate my 2 home screens. And while Categories is useful for separating and launching individual apps, I would still recommend launching more intensive apps outside of the folder browser
SBSettings

Installous
SBSettings is an essential (and totally free) application. Right after you jailbreak, after OpenSSH, this should be the second app you download off Cydia. SBSettings overlays a menu that contains the basic functions of the system “options” menus. This overlay menu is easily accessed by swiping the bar at the top of the screen with the time and contains things like Brightness, 3G, Wi-Fi, and other switches to turn things on and off.
Bar none, this app is the most useful thing inside Cydia for your daily use of the phone. Especially being able to control brightness inside ANY application will show you that your jailbreak was not in vain.

Installous once again has wowed us with its ability to be so much more than a simple app repository. Due to the overwhelming number of pirates on the previous Appulo.us server, the app now uses a better, harder, faster, stronger server that’s much, much, much more user and network friendly. Browsing and downloading apps is now easier than ever on your 3G phone. Again, we caution you to watch out for apps that are just pirated versions of App Store apps. Rather, use Installous to get those apps that are gone now from the App Store or couldn’t make it on there in the first place (like those with adult content).
Note: The install process remains the same, you need to add the hackulo.us repository to Cydia. Simply go into Cydia, navigate over to Manage, then click on Sources, and click Edit in the top right hand corner, then Add on the top left corner, once you’ve clicked add, type in “Cydia.hackulo.us” into the http repository screen. Then tap on Add Source and it’ll give you a message about piracy. Click OK on the message and download Installous through this new repo!
Cycorder
Cycorder is a little less pivotal this time around because 3GS users already know what it’s like to have a good video camera on the phone. Nevertheless, Cycorder is a tremendous app for those of us who still live just fine with our 3G iPhones. Cycorder records video just as well as it did last year and has added a few bug fixes since the writing of this article last August. Today you’ll find a much easier-to-use app as well as one that’s a bit more flexible in terms of shooting.
The ability to SSH into the phone and extract the videos remains a huge draw for those amateur videographers without video-camera equipped iPhones.
Note: REMEMBER TO FILM YOUR VIDEOS IN HORIZONTAL MODE! If you don’t, you’ll have to change the orientation of the videos in a very roundabout way.
dTunes
Tunes has also undergone a bit of an overhaul in 2010. Some essential bug fixes have made the user interface far easier to handle and the torrenting even better. dTunes is a torrenting app that allows you to grab torrents and download on the go, even over 3G. This means that you could potentially grab songs off of independent bittorrent trackers that have free music on them. These songs are then playable in an internal media player, and are easily transferrable to iTunes once you reach a station capable of SSH.
Don’t get me wrong though, dTunes is still a bit buggy, so I’d caution you to use this app carefully to avoid any of the nasty Trojans and worms that are now circulating and have made their way onto the iPhone. The directions for running torrents off your phone are easy to understand and pretty much anyone with a tiny bit of experience could get it running – just don’t count on their recommended video, music and photo sites.
Categories

Categories is a pivotal app for those of us that want a little more organization out of our phones. Categories allows the user to “wrangle” the icons on the various home screens into a self-contained folder that can then launch those programs. The idea works as well as it is ingenious – that is to say incredibly well.
Games, Jailbreak, and “Useless System Apps” currently populate my 2 home screens. And while Categories is useful for separating and launching individual apps, I would still recommend launching more intensive apps outside of the folder browser
SBSettings

Installous
SBSettings is an essential (and totally free) application. Right after you jailbreak, after OpenSSH, this should be the second app you download off Cydia. SBSettings overlays a menu that contains the basic functions of the system “options” menus. This overlay menu is easily accessed by swiping the bar at the top of the screen with the time and contains things like Brightness, 3G, Wi-Fi, and other switches to turn things on and off.
Bar none, this app is the most useful thing inside Cydia for your daily use of the phone. Especially being able to control brightness inside ANY application will show you that your jailbreak was not in vain.
Best Iphone Application which I am addicted to..
IS your iPhone dependent to your personal Computer?
Do you pair them every night to charge and sync, sending those extra emails you may have missed on your iphone from your laptop?
Would you like this little sister to break free, grow up and become the independent powerhouse you always knew she was destined to be?
Here are a few Apps how to make your iPhone independent
1. IM+
Cool App. for those who frequent want to stay in tough with their friend. I will put it like these all in one messenger you can access multiple account at same time. Yahoo, gtalk, orkut, facebook etc...
*Solution- Simply click on www.apptrackr.org
2. iblutooth
For those who want to share every thing with their friend. You can simply share pictures, music & Video through bluetooth.
3. Skype
Expensive overseas calls are a pain in the butt.
*Solution: Get free Skype application and hang out at Free WIFI zone and make calls to Anywhere. – You will get it from Appstore at no cost
If you are pised off accesing skype through WIFI than here is a solution than you need to purchase 3g Internet plan after that simply Istall:
"3G Unrestrictor" is a relatively cheap app that is vital if you’re ever going to take your iPhone into the “Unlimited” plan you actually purchased it for.
What this app does is it enables you to access the 3G network for things the iPhone would normally block by tricking it into thinking that it is operating over Wi-Fi. This means that you can make Skype calls out on the middle of the highway, or watch videos over Slingbox while waiting in the doctor’s office that doesn’t have Wi-Fi. Personally, lifting the 10 Mb limits on the App Store and iTunes respectively is awesome – because now larger podcast downloads are just clicks away.
4. Keep track of your expenses (I love it)
I’m juggling so many other things, organizing my own finances always seems to fall to the bottom of the to-do list. And that receipt… Where did I put it? And don’t forget to send that invoice you’ve been promising!…
*Solution: iXpenselt iPhone application (http://apptrackr.org)
5. Keep track of your Stakeholders and Friends
Make group and promotional emailing easier on the go.
Keep track of everyone in well organised categories.
*Solution: Groups iPhone app
6. VPN
The saviour of potential heart attacks.
Working in IT, anything and everything can go wrong last minute.
If you have a tech buddy who can pull you through that last minute fix, you’re very lucky. But if you’re in Hong Kong and he’s in San Fran., errr, not so lucky.
Make sure your IT angel has this on his iPhone if he’s on the go himself. This will allow him the ability to log onto your computer from anywhere in the world and control its applications and update any relevant code last minute.
If you see a cursor moving magically across the screen by itself, know that you’re guy is on the other side. You’ll have to accept him so it’s secure. Make sure to log out at the end.
Phew! What a relief!
*Solution: ezShare iPhone app -v. handy for those who are tech dependents
7. Keep handy documents in your pocket
Documents that you will always need on hand:
-Most recent Bio and CV
-List of Clients and Contact Details
-Images and promotional material
-Explanatory videos
-A flash brochure of your company?…good foor for thought
*Solution: File Magnet iPhone app -Hold these files and documents in one easy to reach place on your iPhone
Use these tools for project management and keeping your business on track at all times.
If you want more tips or to get project management certification then check out the hyperlinks.
8. Birthday Reminder
Rarely check Facebook to see upcoming birthdays? This app downloads all of that information so you can access and easily see upcoming bdays offline.
Do you pair them every night to charge and sync, sending those extra emails you may have missed on your iphone from your laptop?
Would you like this little sister to break free, grow up and become the independent powerhouse you always knew she was destined to be?
Here are a few Apps how to make your iPhone independent
1. IM+
Cool App. for those who frequent want to stay in tough with their friend. I will put it like these all in one messenger you can access multiple account at same time. Yahoo, gtalk, orkut, facebook etc...
*Solution- Simply click on www.apptrackr.org
2. iblutooth
For those who want to share every thing with their friend. You can simply share pictures, music & Video through bluetooth.
3. Skype
Expensive overseas calls are a pain in the butt.
*Solution: Get free Skype application and hang out at Free WIFI zone and make calls to Anywhere. – You will get it from Appstore at no cost
If you are pised off accesing skype through WIFI than here is a solution than you need to purchase 3g Internet plan after that simply Istall:
"3G Unrestrictor" is a relatively cheap app that is vital if you’re ever going to take your iPhone into the “Unlimited” plan you actually purchased it for.
What this app does is it enables you to access the 3G network for things the iPhone would normally block by tricking it into thinking that it is operating over Wi-Fi. This means that you can make Skype calls out on the middle of the highway, or watch videos over Slingbox while waiting in the doctor’s office that doesn’t have Wi-Fi. Personally, lifting the 10 Mb limits on the App Store and iTunes respectively is awesome – because now larger podcast downloads are just clicks away.
4. Keep track of your expenses (I love it)
I’m juggling so many other things, organizing my own finances always seems to fall to the bottom of the to-do list. And that receipt… Where did I put it? And don’t forget to send that invoice you’ve been promising!…
*Solution: iXpenselt iPhone application (http://apptrackr.org)
5. Keep track of your Stakeholders and Friends
Make group and promotional emailing easier on the go.
Keep track of everyone in well organised categories.
*Solution: Groups iPhone app
6. VPN
The saviour of potential heart attacks.
Working in IT, anything and everything can go wrong last minute.
If you have a tech buddy who can pull you through that last minute fix, you’re very lucky. But if you’re in Hong Kong and he’s in San Fran., errr, not so lucky.
Make sure your IT angel has this on his iPhone if he’s on the go himself. This will allow him the ability to log onto your computer from anywhere in the world and control its applications and update any relevant code last minute.
If you see a cursor moving magically across the screen by itself, know that you’re guy is on the other side. You’ll have to accept him so it’s secure. Make sure to log out at the end.
Phew! What a relief!
*Solution: ezShare iPhone app -v. handy for those who are tech dependents
7. Keep handy documents in your pocket
Documents that you will always need on hand:
-Most recent Bio and CV
-List of Clients and Contact Details
-Images and promotional material
-Explanatory videos
-A flash brochure of your company?…good foor for thought
*Solution: File Magnet iPhone app -Hold these files and documents in one easy to reach place on your iPhone
Use these tools for project management and keeping your business on track at all times.
If you want more tips or to get project management certification then check out the hyperlinks.
8. Birthday Reminder
Rarely check Facebook to see upcoming birthdays? This app downloads all of that information so you can access and easily see upcoming bdays offline.
Tuesday, May 4
How to use GPRS in your iphone
Hey yo so if you tired of paying higher charges for your Iphone data plan and you are not able to use any normal GPRS Service in your iphone than her is the trickjust simply follow the instruction...
Have tried for Vodafone India – GPRS for iPhone without Data Plan
I have just configured GPRS (Vodafone Live) on my jail broken iPhone which is running 3.0 firmware.
Using OpenSSH (If you are not familiar with Open SSH than just google it), edit preferences.plist located in /private/var/preferences/SystemConfiguration.
Important: Make sure you take a backup of the original preferences.plist.
Around line number 89 (this is appox line number, contents of the file may change based on your phone settings) replace the with below
Update: The below configuration is working on 3.1.2 as well, but the line numbers are little different.

To activate Vodafone Live (GPRS) see Vodafone (Websitehttp://www.vodafone.in/existingusers/vodafonelive/pages/subscribe_n_settings.aspx)
Many guys have complained that the changes that were made in preferences.plist are lost after restarting the iPhone (for versions 3.1.2 and 3.1.3). So today i decided to take a look at it. And what you guys said is absolutely right, today i upgraded my iPhone OS to 3.1.3 and i see that the settings are lost after restarting the phone. And you guys dont worry, i have found a way to fix this. Below are the step by step instructions.
1. Download and Install iPhone Configuration Utility from http://support.apple.com/kb/DL926
2. Open the application, Select Configuration Profiles on the left hand side menu and click New in the toolbar; Enter the name, identifier, organization and description; see the image below for more details

3. Now go to Advanced option and set the apnname = portalnmms, proxy server =10.10.1.100 and port = 9401

4. Connect your iPhone to computer via USB cable and you should see your iPhone in the devices menu on Left hand side. Select your device
5. Select Configuration Profiles tab and you should see the Vodafone Profile; Click on Install

6. You will see a pop on your iPhone asking your permission to install the configuration, Click Install button in your iPhone

7 And you are done with the configuration. You should be able to use internet on your iPhone now. If its not working just reboot your phone.
Have tried for Vodafone India – GPRS for iPhone without Data Plan
I have just configured GPRS (Vodafone Live) on my jail broken iPhone which is running 3.0 firmware.
Using OpenSSH (If you are not familiar with Open SSH than just google it), edit preferences.plist located in /private/var/preferences/SystemConfiguration.
Important: Make sure you take a backup of the original preferences.plist.
Around line number 89 (this is appox line number, contents of the file may change based on your phone settings) replace the
Update: The below configuration is working on 3.1.2 as well, but the line numbers are little different.

To activate Vodafone Live (GPRS) see Vodafone (Websitehttp://www.vodafone.in/existingusers/vodafonelive/pages/subscribe_n_settings.aspx)
Many guys have complained that the changes that were made in preferences.plist are lost after restarting the iPhone (for versions 3.1.2 and 3.1.3). So today i decided to take a look at it. And what you guys said is absolutely right, today i upgraded my iPhone OS to 3.1.3 and i see that the settings are lost after restarting the phone. And you guys dont worry, i have found a way to fix this. Below are the step by step instructions.
1. Download and Install iPhone Configuration Utility from http://support.apple.com/kb/DL926
2. Open the application, Select Configuration Profiles on the left hand side menu and click New in the toolbar; Enter the name, identifier, organization and description; see the image below for more details

3. Now go to Advanced option and set the apnname = portalnmms, proxy server =10.10.1.100 and port = 9401

4. Connect your iPhone to computer via USB cable and you should see your iPhone in the devices menu on Left hand side. Select your device
5. Select Configuration Profiles tab and you should see the Vodafone Profile; Click on Install

6. You will see a pop on your iPhone asking your permission to install the configuration, Click Install button in your iPhone

7 And you are done with the configuration. You should be able to use internet on your iPhone now. If its not working just reboot your phone.
Thursday, April 29
Manually Configure Gmail IMAP accounts properly in the iPhone
Configuring the Gmail account on an iPhone:
If you are experiencing problems like you have delete messages two times from Iphone and also from Gmail than here is a solution:
Go to the iPhone’s Home screen and launch the Settings application. Select the "Mail, Contacts, Calendars" option now choose "Add Account…" then choose "Other" (The Gmail option listed on this screen is for POP account setup).
Enter a Name, Address, Password and Description, then touch the ‘Save‘ button. Choose the ‘IMAP‘ tab, enter ‘imap.gmail.com‘ as your Incoming Mail Server then enter your User Name (your full email address) and Password Now enter ‘smtp.gmail.com‘ as your Outgoing Mail Server, then enter your User Name (your full email address) and Password, then touch the ‘Save‘ button again.
Once account setup has finished, go to the main screen of the Settings application, choose your email account, and select the ‘Advanced‘ item.
Change your ‘Drafts Mailbox‘, ‘Sent Mailbox‘, and ‘Deleted Mailbox‘ settings to their respective folders where you want in ‘[Gmail]‘,For Eg: If I want that my Deletd Mail should be shown in trash in my Gmail server than Just simply select TRASH in "DELETED MAILBOX" then change the ‘Remove‘ setting to ‘Never‘. Change the ‘IMAP Path Prefix‘ setting to [Gmail].


If you are experiencing problems like you have delete messages two times from Iphone and also from Gmail than here is a solution:
Go to the iPhone’s Home screen and launch the Settings application. Select the "Mail, Contacts, Calendars" option now choose "Add Account…" then choose "Other" (The Gmail option listed on this screen is for POP account setup).
Enter a Name, Address, Password and Description, then touch the ‘Save‘ button. Choose the ‘IMAP‘ tab, enter ‘imap.gmail.com‘ as your Incoming Mail Server then enter your User Name (your full email address) and Password Now enter ‘smtp.gmail.com‘ as your Outgoing Mail Server, then enter your User Name (your full email address) and Password, then touch the ‘Save‘ button again.
Once account setup has finished, go to the main screen of the Settings application, choose your email account, and select the ‘Advanced‘ item.
Change your ‘Drafts Mailbox‘, ‘Sent Mailbox‘, and ‘Deleted Mailbox‘ settings to their respective folders where you want in ‘[Gmail]‘,For Eg: If I want that my Deletd Mail should be shown in trash in my Gmail server than Just simply select TRASH in "DELETED MAILBOX" then change the ‘Remove‘ setting to ‘Never‘. Change the ‘IMAP Path Prefix‘ setting to [Gmail].


Saturday, February 27
ibluetooth for iphone 3g
These are instructions on how to install and use iBluetooth, an application which enables bluetooth file transfer on the iPhone.
Step One
Press to launch Cydia from your SpringBoard

Step Two
Press to select the Sections tab at the bottom of the screen

Step Three
Press to choose System from the list of Sections.

Step Four
Press to select iBluetooth from the list of Packages

Step Five
Press the Install button at the top right of the screen.
Step Six
Press the Confirm button at the top right of the screen to begin installation.
Step Seven
Once the installation has completed successfully. Press the large Return to Cydia button
Step Eight
Press the Home button to return to your SpringBoard. Notice we now have a new iBluetooth icon.
Step Nine
Press to launch Settings from your SpringBoard.
Step Ten
Press to choose General from the Settings Menu.
Step Eleven
Press to select Bluetooth from the General Menu.
Step Twelve
Move the Bluetooth toggle switch to the ON position.
Step Thirteen
Press the Home button to return to the Springboard then press the iBluetooth icon.

Step Fourteen
iBluetooth will start and inform you that it is disabling the system bluetooth. Note*: I had to enable the system bluetooth to successfully start iBluetooth. Press the large OK button.

Step Fifteen
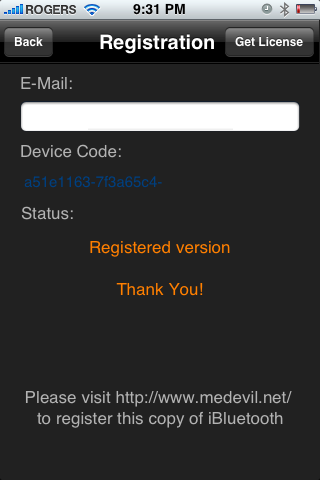
You will now be asked to register by visiting http://www.medevil.net. Register on the site then come back and press the Get License button at the top right of the screen.

Step Sixteen
A popup will appear to let you know your license is valid. Press the large OK button.

Step Seventeen
Press the Back button at the top left of the screen.

Step Eighteen
From the iBluetooth Home Tab press the Settings icon at the top right of the screen.
Step Nineteen
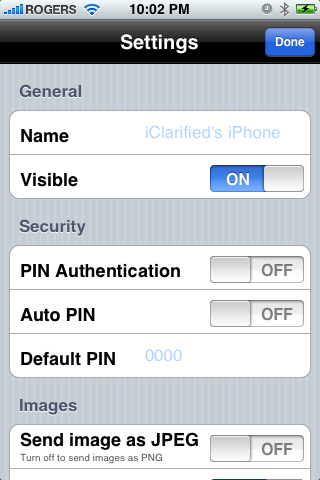
From the settings menu you can change the name and visibility of your iPhone.
You can also set a PIN for allowing incoming bluetooth connections.
Under the images section you can choose to send images as jpg instead of png. Also you can select to have images saved in your photo library.
From the file system section you can decide to show hidden files and set the save path and ftp root path.
Press Done to return to the iBluetooth Home screen.

SEND AN IMAGE
Press the Images tab to open your photo albums.

Press Photo Library to open the album.

Press to select a photo you would like transfered via bluetooth.
From the photo preview press the send icon at bottom center of the image.
iBluetooth will now search for nearby bluetooth devices. Press to select one from the list
To send the image press the large Send button that appears.

A number 1 will appear over the Activity Tab. Press to select it.
Notice that the file progress is shown.
Once the file transfer is complete you can press the Trash icon to remove it from the activity log
SEND A FILE
Press the Files tab to open the file system browser
Navigate to the folder that contains the file you would like to send. I am going to select a file from the /var/mobile/Documents folder.

Press to select the filename you would like to send.
iBluetooth will now search for nearby bluetooth devices. Press to select one from the list.
To send the file press the large Send button that appears.
Once the receiver accepts your transfer you will see the transfer progress shown under the Activity Tab.

When the file transfer is complete you can press the Trash icon to remove it from the activity log.
RECEIVE A FILE
To receive a file from another bluetooth device make sure your iPhone is visible so the other device can find you.

When you are sent a file iBluetooth will notify you of an incoming file transfer. Press the Save As button to select the download location.
iBluetooth will open to the file system browser.
You can now set the name for the incoming file. To set the directory, simply navigate to the folder you would like to save the file in. Press the Done button to start the transfer.
But if You want to tranfer Music
To send a few music files from my iphone to pc..they were located in the filesystem tab in the ibluetooth programe (havent tried a vid swap yet tho) The trouble is when you get to the audio files, you never realy know what track your sending as there are no titles....just numeric jiberish. Wonder if anyone knows a way around this?
But if you navigate to filesystem>private>var>mobile>media you should be able to locate your audio/video files
Step One
Press to launch Cydia from your SpringBoard
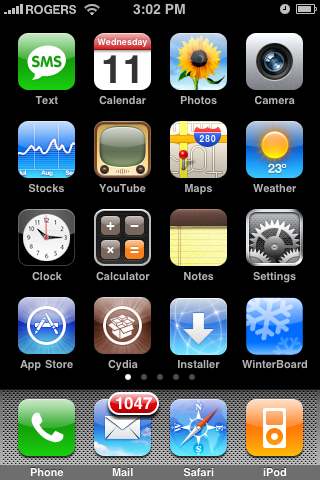
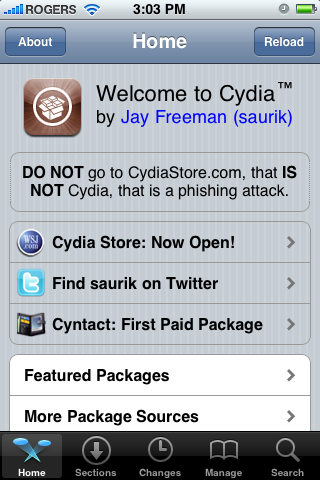
Step Two
Press to select the Sections tab at the bottom of the screen
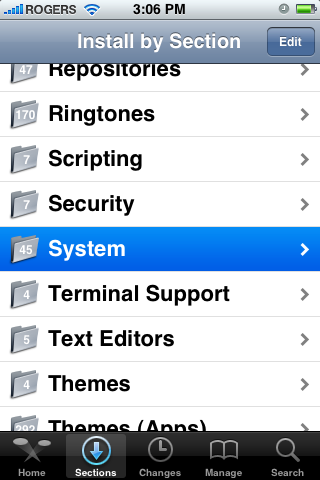
Step Three
Press to choose System from the list of Sections.
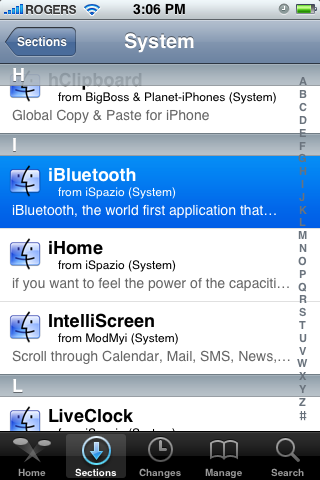
Step Four
Press to select iBluetooth from the list of Packages
Step Five
Press the Install button at the top right of the screen.
Step Six
Press the Confirm button at the top right of the screen to begin installation.
Step Seven
Once the installation has completed successfully. Press the large Return to Cydia button
Step Eight
Press the Home button to return to your SpringBoard. Notice we now have a new iBluetooth icon.
Step Nine
Press to launch Settings from your SpringBoard.
Step Ten
Press to choose General from the Settings Menu.
Step Eleven
Press to select Bluetooth from the General Menu.
Step Twelve
Move the Bluetooth toggle switch to the ON position.
Step Thirteen
Press the Home button to return to the Springboard then press the iBluetooth icon.
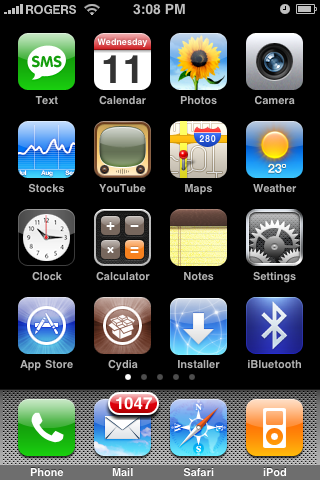
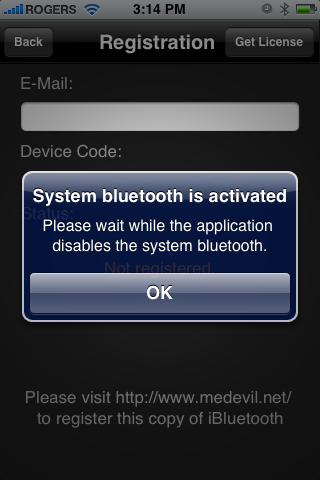
Step Fourteen
iBluetooth will start and inform you that it is disabling the system bluetooth. Note*: I had to enable the system bluetooth to successfully start iBluetooth. Press the large OK button.
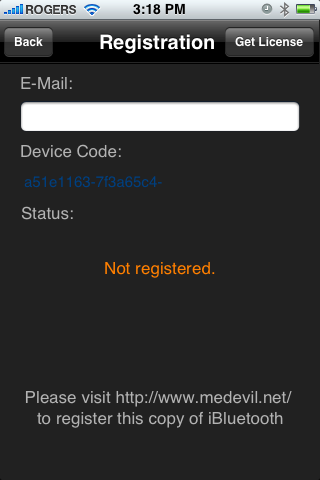
Step Fifteen
You will now be asked to register by visiting http://www.medevil.net. Register on the site then come back and press the Get License button at the top right of the screen.
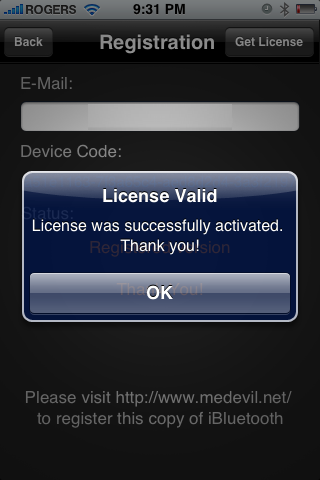
Step Sixteen
A popup will appear to let you know your license is valid. Press the large OK button.
Step Seventeen
Press the Back button at the top left of the screen.
Step Eighteen
From the iBluetooth Home Tab press the Settings icon at the top right of the screen.
Step Nineteen
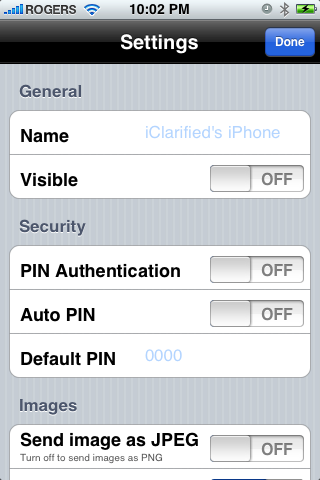
From the settings menu you can change the name and visibility of your iPhone.
You can also set a PIN for allowing incoming bluetooth connections.
Under the images section you can choose to send images as jpg instead of png. Also you can select to have images saved in your photo library.
From the file system section you can decide to show hidden files and set the save path and ftp root path.
Press Done to return to the iBluetooth Home screen.
SEND AN IMAGE
Press the Images tab to open your photo albums.
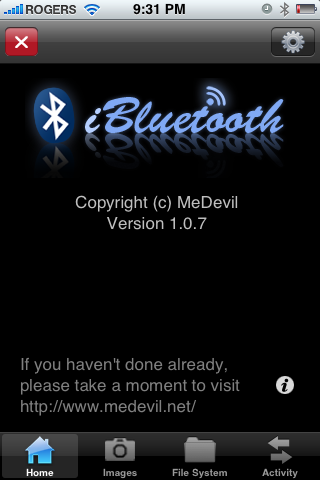
Press Photo Library to open the album.

Press to select a photo you would like transfered via bluetooth.
From the photo preview press the send icon at bottom center of the image.
iBluetooth will now search for nearby bluetooth devices. Press to select one from the list
To send the image press the large Send button that appears.
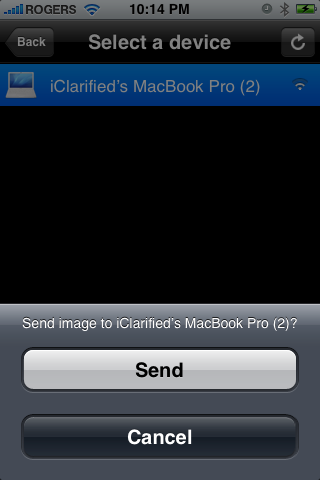
A number 1 will appear over the Activity Tab. Press to select it.
Notice that the file progress is shown.
Once the file transfer is complete you can press the Trash icon to remove it from the activity log
SEND A FILE
Press the Files tab to open the file system browser
Navigate to the folder that contains the file you would like to send. I am going to select a file from the /var/mobile/Documents folder.
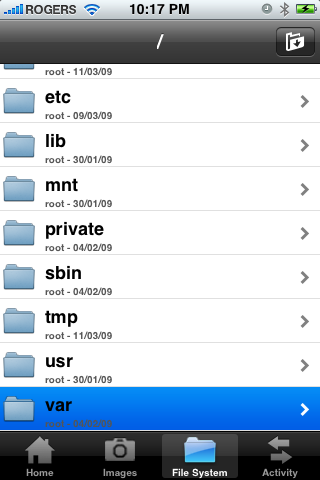
Press to select the filename you would like to send.
iBluetooth will now search for nearby bluetooth devices. Press to select one from the list.
To send the file press the large Send button that appears.
Once the receiver accepts your transfer you will see the transfer progress shown under the Activity Tab.
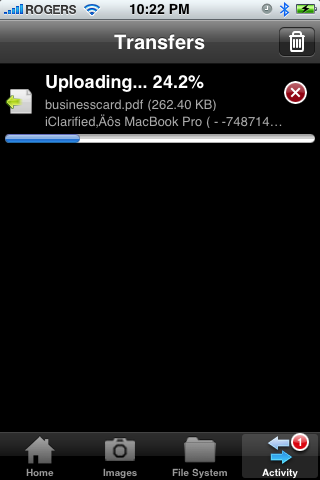
When the file transfer is complete you can press the Trash icon to remove it from the activity log.
RECEIVE A FILE
To receive a file from another bluetooth device make sure your iPhone is visible so the other device can find you.
When you are sent a file iBluetooth will notify you of an incoming file transfer. Press the Save As button to select the download location.
iBluetooth will open to the file system browser.
You can now set the name for the incoming file. To set the directory, simply navigate to the folder you would like to save the file in. Press the Done button to start the transfer.
But if You want to tranfer Music
To send a few music files from my iphone to pc..they were located in the filesystem tab in the ibluetooth programe (havent tried a vid swap yet tho) The trouble is when you get to the audio files, you never realy know what track your sending as there are no titles....just numeric jiberish. Wonder if anyone knows a way around this?
But if you navigate to filesystem>private>var>mobile>media you should be able to locate your audio/video files
Subscribe to:
Posts (Atom)